HP LaserJet Pro MFP M329, M428, M429 - Printer views
HP LaserJet Pro MFP M329, M428, M429 - Printer views
Identify parts on the printer and buttons on the control panel.
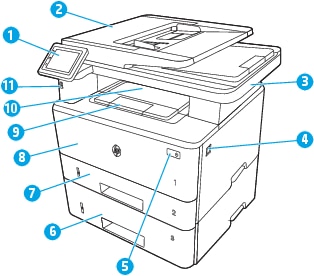
Printer front view
Identify the parts on the front of the printer.
Printer front view
Figure : Printer front view
-
Control panel (tilts up for easier viewing)
-
Document feeder
-
Scanner
-
Front door release button (access to the toner cartridge)
-
Power on/off button
-
Tray 3 (optional)
-
Tray 2
-
Tray 1
-
Output bin extension
-
Output bin
-
Walk-up USB port (for printing and scanning without a computer)
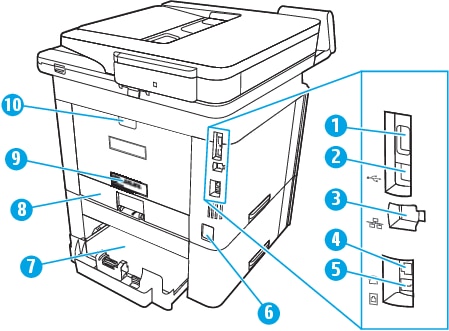
Printer back view
Identify the parts on the back of the printer.
Printer rear view
Figure : Printer rear view
-
USB port (for job storage and private printing)This port might be covered.
-
USB interface port
-
Ethernet port
-
Telephone "line out" port (for attaching an extension phone, answering machine, or other device)
-
Fax "line in" port (for attaching the fax phone line to the printer)
-
Power connection
-
Tray 3 (optional)Tray 3 extends when legal-size or A4-size paper is loaded.
-
Dust cover for Tray 2Dust cover flips up when legal-size or A4-size paper is loaded.
-
Serial number and printer number label
-
Rear door (provides access for clearing jams)
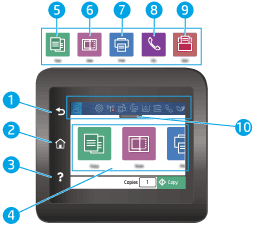
Control panel view
Identify the buttons and features on the touchscreen control panel.
The Home screen provides access to the printer features and indicates
the current status of the printer.
Return to the Home screen at any time by touching the Home button on
the left side of the printer control panel, or touch the Home button
in the upper-left corner of most screens.
NOTE:For more information about the printer control panel features, go to www.hp.com/support/ljM329MFP, www.hp.com/support/ljM428MFP, or www.hp.com/support/ljM429MFP.
NOTE:The features that appear on the Home screen can vary, depending on the printer configuration.
Control panel view
Figure : Control panel view
|
Number
|
Item
|
Description
|
|
1
|
Back button
|
Returns to the previous screen.
|
|
2
|
Home button
|
Provides access to the Home screen.
|
|
3
|
Help button
|
Provides access to the control panel help system.
|
|
4
|
Color touchscreen
|
Provides access to menus, help animations, and printer
information.
|
|
5
|

|
Copy icon: Touch this icon to open
the Copy menu.
|
|
6
|

|
Scan icon: Touch this icon to open
the Scan menus:
|
|
7
|

|
Print icon: Touch this icon to open
the Print menus.
|
|
8
|

|
Fax icon: Touch this icon to open
the Fax menus.
|
|
9
|

|
Apps icon: Touch this icon to open
the Apps menu to print directly from select Web
applications.
|
|
10
|
Home screen dashboard display icons
|
See the table that follows for a description of the icons.
Pull down this tab to open the Jobs menu.
|
NOTE:While the control panel does not have a standard Cancel button, during many printer processes a Cancel button appears on the touchscreen. This permits users to cancel a process before the printer completes it.
Home screen dashboard display icons
|
Icon
|
Purpose
|

|
Sign-in icon.
|

|
Setup icon: Opens the Setup menu, where
you can change preferences and perform maintenance
functions.
|

|
Wireless icon: Opens the Wireless
Summary menu, where you can check wireless status
and change wireless settings. You can also print a
wireless test report, which helps diagnosing network
connection issues.
|

|
HP ePrint icon: Opens the Web Services
Summary menu, where you can check ePrint status
details, change ePrint settings, or print an Info
page.
|

|
Wi-Fi Direct icon: Opens theWi-Fi Direct menu,
where you can turn on Wi-Fi Direct, turn off Wi-Fi
Direct, and display the Wi-Fi Direct name and
password.
|

|
Cartridge icon: Opens the Cartridge Information
screen, where you can view the estimated level and
pages remaining for the toner cartridge.
|

|
Paper Setup icon: Opens the Paper Setup menu,
where you can configure the default Paper Size and
Paper Type for the paper trays.
|

|
Fax Status icon: Displays status information for the
Auto Answer function, fax logs, and the fax sound
volume.
|

|
ECO icon: Allows you to configure some of the printer
environmental features.
|
How to use the touchscreen control panel
Use the following actions to use the printer touchscreen control
panel.
|
Action
|
Description
|
Example
|
|
Touch

|
Touch an item on the screen to select that item or open
that menu. Also, when scrolling through menus, briefly
touch the screen to stop the scrolling.
|
Touch the Setup
 icon to open the Setup menu. icon to open the Setup menu.
|
|
Swipe

|
Touch the screen and then move your finger horizontally to
scroll the screen sideways.
|
Swipe the Home screen to access additional menu options.
|
|
Scroll

|
Touch the screen and then move your finger vertically to
scroll the screen up and down. When scrolling through
menus, briefly touch the screen to stop the scrolling.
|
Scroll through the Setup menu.
|
https://support.hp.com/

Comments
Post a Comment